Installation on Windows
| Version | Date | Notes | By |
|---|---|---|---|
| 0.9 | 2025-08-28 | Updated PHP version to 8.4 and added extensions | BRB |
| 0.8 | 2022-05-04 | Updated PHP version to 8.1 and added extensions | BRB |
| 0.7 | 2020-09-09 | Updated wkhtmltopdf instructions | FPA |
| 0.6 | 2020-01-21 | Restructured | JFM |
| 0.5 | 2019-06-17 | Added wkhtmltopdf and offline installation | JTO |
| 0.4 | 2018-07-16 | Added WebDAV information. New extensions. Small fixes | JFM |
| 0.3 | 2017-10-30 | Changed the sqlsrv driver version | JFM |
| 0.2 | 2017-10-30 | Added laravel-echo-server and laravel queues configuration | JFM |
| 0.1 | 2017-04-07 | Initial release | JFM |
Windows Server 2012 + IIS 8
Software needed
| Software | Version | Notes |
|---|---|---|
| PHP for windows | 8.4 VC16 x64 Non Thread Safe | |
| IIS Rewrite Module | Current | |
| Visual C++ Redistributable for Visual Studio 2015 | Current | |
| Redis | 3.0.x | |
| Composer | Current | |
| NodeJS | 22.x.x | |
| wkhtmltopdf | Stable | |
| PHP sqlsrv extension | Check requirements | System requirements |
| ODBC Driver | ODBC Driver 17 | |
| Ioncube Loader | Windows VC15 (Non-TS) (64 bits) | Only needed for encrypted installations |
| Git | Current | |
| PHP_IMAGICK | 8.4 Not Thread Safe x64 | Follow installation guide (all DLLs in PHP folder) |
Install Git
- Execute the installation file
- Accept all default options and finish the installation
- Test it by right click on any folder and choose
Bit Bash Herethen rungit --version
Redis
Redis does not officialy build Windows binaries, but you can use the ones officially supported by the Microsoft Open Technologies team.
As of the moment of writing this guide, the production ready version is the latest from the 3.0.x branch The 3.2.x is available but not ready for production
- Execute the installation file
- Use default port (6379) or change it if needed
- Set the Max Memory limit to 256MB
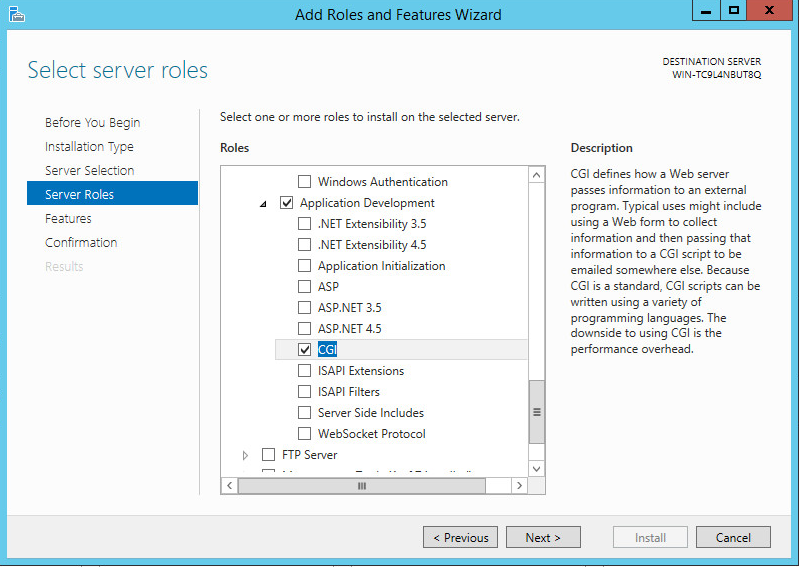
Install IIS
- Go to the Server Manager and on the Manage menu chose the Add Roles and Features
- Click Next until the Select server roles window and select the Web Server (IIS) Checkbox
- Click Add Features
- Click Next until the Select role services window
- Expand the Application Development branch and check the CGI option
- Click Next and then Install
- Install the IIS Rewrite Module
Install PHP
This guide was base on the official installation instructions: http://php.net/install.windows
- Install the Visual C++ Redistributable for Visual Studio 2015
- Unzip the PHP installation file to a folder, something like
c:\php - Create a copy of the file php.ini-production and rename it to php.ini
- Add the php folder to the Windows PATH
- Do the following changes to the php.ini file (uncomment if needed)
| Directive | Notes |
|---|---|
| cgi.force_redirect = 0 | |
| cgi.fix_pathinfo=1 | |
| fastcgi.impersonate = 1 | |
| fastcgi.logging = 0 | |
| sys_temp_dir = "c:\temp" | Change to the system's temp folder. |
| extension_dir = "c:\php\ext" | Change to the PHP extension folder. |
| post_max_size = 108M | Change to something like this. |
| upload_max_filesize = 102M | Change to something like this. |
| max_execution_time = 60 | Change to something like this. |
- If the software is configured to use https you may need the curl certificate which you can download it here. Save it somewhere on the machine (Ex: c:\php) and configure it in php.ini on the curl.cainfo directive, Ex:
curl.cainfo = 'c:/php/cacert.pem'
PHP Extensions
Uncomment/Add the following extension in php.ini file
- curl
- fileinfo
- gd
- intl
- ldap
- mbstring
- openssl
- soap
- sodium
- mysql - If using MySQL/MariaDB
- sqlsrv - If using SQL Server
- redis
- imagick
Installing the sqlsrv driver
- Extract the files from the downloaded zip and copy the appropriate PDO dll (php_pdo_sqlsrv_81_nts.dll) to the PHP extensions folder
- Next add the extension to php.ini: extension=php_pdo_sqlsrv_81_nts
Configuring the frontend and backend
Folder permissions
You must give the user IUSR and the group IIS_IUSR permissions to read both folders, and write permissions to the folder storage and bootstrap/cache on the backend folder
You have 2 choice, either use sub-domains (best option) or use different ports
Using different ports
The frontend and the backend need to be on a different website, you can use the default web site for the frontend and create a new one for the backend.
Frontend
If you can use the frontend just rename it to frontend and go to step 3
- Right-click on the Sites branch and click Add Website
- Name it frontend, fill the other fields accordingly. If needed, change the port to something available (you don't need to fill the Host name field)
- Select the frontend branch and on the right panel click Basic Settings
- Change the Physical path to the frontend folder.
- Still on the frontend double-click the MIME Types option and add a new mime type
application/font-woff2for the extension.woff2 - Check if it worked by executing http://localhost/ on the browser
Backend
For the backend we need to configure PHP, so there's some extra steps.
- Right-click on the Sites branch and click Add Website
- Name it backend, Fill the fields accordingly and change the port to something available like 8080 (you don't need to fill the Host name field)
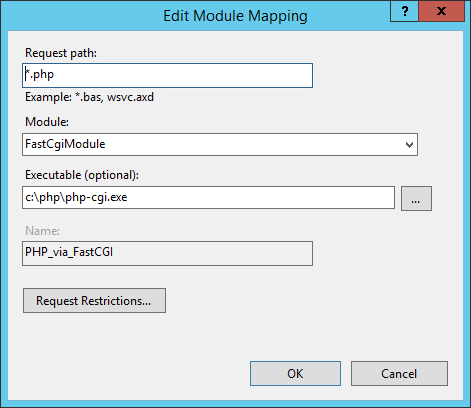
- Next choose the website just created and in the middle panel, double click on the Handler Mapping
- Then on the right panel choose the option Add Module Mapping and fill the fields accordingly.
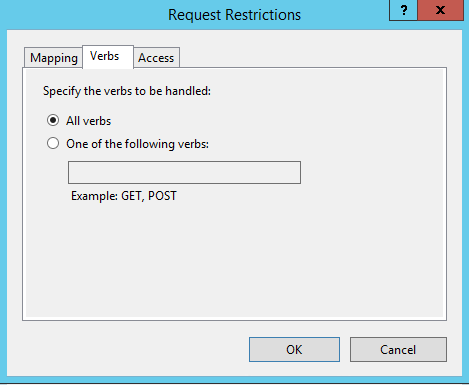
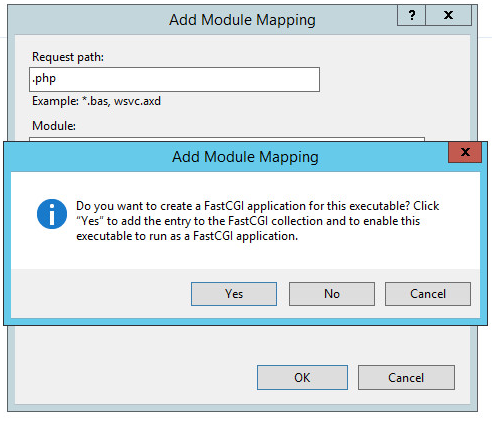
- Click on the Request Restrictions..." button, and on the Verb tab be sure to have the All verbs option selected
- Click OK twice and then click Yes again
- Next, select the backend branch and double click the Default Document option.
- Right click, choose Add Default Document, add index.php to textbox and click ok
- Re-order the option so that index.html is first and index.php is second
- Create a phpinfo.php file on the backend folder with the following code:
<?php phpinfo() - On the browser run the url: http://localhost/phpinfo.php (be sure to use the port defined previously for the backend) if everything went right you should the PHP information page. Check if all the extensions are loaded. You should delete the file after.
Using sub-domains
This is similar to the Using different ports method, the only difference is that you must fill the Host name with the corresponding sub-domain for each website and you don't need to specify different ports for the frontend and backend since IIS will redirect the request base on the sub-domain
Common configurations
If IIS is configured with the WebDAVModule you may have errors using the PUT verb. To solve it you have to remove it by adding the following lines to the webconfig file
<modules>
    <remove name="WebDAVModule"/>
</modules>
<handlers>
<remove name="WebDAV"/>
</handlers>
Composer
- Execute the installation file
- Click Next and confirm the location of php.exe
- Click Next, if needed, configure the proxy, then click Install
- Click Next, read the instructions and click Finish
- Test it by launching the command line terminal and running
composer --version
Install SGI
Backend
- git clone https://gitlab.wemake.pt/wemake/sgi/backend/core backend
- cd backend
- Run
cp .env.example .env, edit it and change the configurations accordingly. - Run
cp laravel-echo-server.example.json laravel-echo-server.json, edit it and change the configurations accordingly. - Run
composer install - Run
php artisan key:generate - Run
php artisan jwt:secret - Use composer to add the modules to install:
composer require wemake/sgi-.... - Run
php artisan migrate
Frontend
Check the development documentation. Export locally and copy to the server
Install NodeJS
- Execute the installation file
- Accept default options and finish the installation
- Test it by launching the command line terminal and running
node --versionandnpm --version
NSSM - the Non-Sucking Service Manager
NSSM is used to create services on windows. We need this to better handle laravel-echo-server and laravel queues
- Extract the downloads file
- Copy the mssm.exe file located in the win32 or win64 folder to a folder that is part of the Windows PATH (Ex: C:\windows) so you can execute from everywhere
Laravel Echo Server
- On the backend folder execute
npm install -g laravel-echo-server. - Copy the
laravel-echo-server.example.jsonfile tolaravel-echo-server.jsonand configure accordingly. - Use the nssm to create a service to run laravel-echo-server:
nssm install wemake-laravel-echo-serverand configure and configure accordingly (change the paths if needed)
Application tab
| Config | Value |
|---|---|
| Path | C:\Users\wemake\AppData\Roaming\npm\laravel-echo-server.cmd |
| Startup directory | C:\inetpub\wwwroot\backend |
| Arguments | start |
Details tab
| Config | Value |
|---|---|
| Display name | Roboyo - Laravel echo server |
| Startup type | Automatic |
I/O tab
| Config | Value |
|---|---|
| Output (stdout) | C:\inetpub\wwwroot\backend\storage\logs\laravel-echo-server.log |
- Start the service using the Windows services interface or by executing
nssm start wemake-laravel-echo-server
Laravel Queue
- Use the nssm to create a service to run laravel queues:
nssm install wemake-laravel-queue-workand configure accordingly (change the paths if needed)
Application tab
| Config | Value |
|---|---|
| Path | C:\php\php.exe |
| Startup directory | C:\inetpub\wwwroot\backend |
| Arguments | artisan queue:work |
Details tab
| Config | Value |
|---|---|
| Display name | Roboyo - Laravel queue work |
| Startup type | Automatic |
I/O tab
| Config | Value |
|---|---|
| Output (stdout) | C:\inetpub\wwwroot\backend\storage\logs\laravel-queue-work.log |
wkhtmltopdf
- Execute the installation file
- Accept all default options or change the installation folder if needed
-
Update the
.envfile accordingly. Example:WKHTML_PDF_BINARY="C:/<instalation_path>/bin/wkhtmltopdf.exe" WKHTML_IMG_BINARY="C:/<instalation_path>/bin/wkhtmltoimage.exe"
You also have to add the IUSR and IIS_IUSRS users to the security properties with read permissions for the wkhtmltopdf folder.
Notes
Don't forget to check if IUSR and IIS_IUSRS users have permissions to the backend folder of the application and if they have access to the temp files folder. If not you can create a new temporary files folder with the right permissions for the users. Edit the php.ini and update the following
sys_temp_dir = "<New-directory-created>"Or you can change the access permissions to the Windows temporary files' directory.